Guava Jam Cake

Who else loves Guava?!

If you are looking for a cake that is easy to make, looks impressive AND is finger-likin delicious.. look no further!!

For this cake you will need:

  • 3/4 cup guava paste (I used Goya)
  • 1 tablespoon of water
  • 3/4 cup unsalted butter, softened
  • 1 1/4 cups granulated sugar
  • 2 large eggs
  • 1 teaspoon vanilla extract
  • 2 1/4 cups flour
  • 1 1/2 teaspoon baking powder
  • 1 teaspoon salt
  • 1/2 teaspoon ground cinnamon
  • 1 1/4 cups sour cream, room temperature
  • Confectioner’s sugar for dusting

Step One  In a small microwave-safe bowl, heat guava paste and 1 tablespoon of water on high in 20 second intervals, stirring in between each, until smooth and spreadable. ( 1 to 1 1/2 minutes total). Let it cool slightly. Spoon Guava mixture into a large piping bag (If you do not have a piping bag, a large ziplock bag will work as well). Set aside.

Step Two: In the bowl of a stand mixer fitted with the paddle attachment, beat butter and granulated sugar at medium speed until fluffy, about 3 to 4 minutes. Add eggs, one at a time, beating well after each addition. Beat in vanilla; scrape sides of bowl.

Step Three: In a medium bowl, whisk together flour, baking powder, salt and cinnamon. With mixer on low speed, gradually add flour mixture to butter mixture alternately with sour cream, beginning and ending with flour mixture. Beat until combined. (Batter will be quite thick).

z3

Step Four: Spoon 2 1/4 cups (about half the batter)  into prepared pan. Using a small offset spatula, spread batter into bottom edges of pan and smooth top. Fill the remaining batter into a large piping bag. Cut a 1/2 inch opening into to tip of batter filled bag; pipe a large ring of batter along the edges of the pan. Next, cut an opening on the guava filled piping bag and pipe guava mixture inside the batter ring. spread evenly with a small offset spatula. Pipe the remaining batter on top of guava mixture. (You can cut the piping bag opening to 1 inch to make pipping easier) Smooth top with a spatula.

Step Five: Heat oven to 350º F. Bake until golden brown, about 50 to 55 minutes. You can check if it ready by inserting a wooden pick in the center and once it comes out clean, it is ready. Let it cook in pan for about 10 minutes before removing off pan. Let it cool completely on a wire rack. Dust with confectioners sugar.

I added a Glaze, this is optional.

You will need:

  •  2 tablespoons unsalted butter
  • 1 cup confectioners sugar
  • 1 tablespoon whole milk
  • 1 teaspoon cointreau (or rum)
  • 1/4 teaspoon kosher salt

In a small saucepan, heat butter over medium heat until just starting to brown, 5 to 7 minutes. Remove from heat. Add confectioners sugar, milk, salt and cointreau; whisk together until smooth. Immediately drizzle on top of cake.
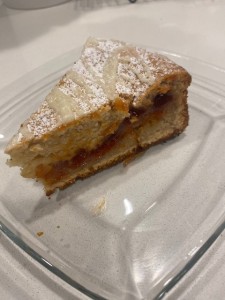
z11


Enjoy!!

Garlic Bread

I am back!!!

I realized I have not posted anything in a year!! With all of this COVID-19 craziness, I thought a new recipe would be a good idea to share.

I went to my local grocery store about three weeks ago and bought a loaf of bread, I totally forgot about it until I opened my pantry and there it was, looking exactly the same it did when I bought it. Don’t get me wrong, there is nothing wrong with buying bread at the store but I started thinking of all the preservatives that the bread had to have in order for it to not go bad in 2-3 weeks. So I started doing some research on these preservatives, and what I found was not good! Some of the preservatives used in our bread also appear on things like yoga mats, explosives and petroleum products!! I read this article called “Banned bread: why does the US allow additives that Europe says are unsafe?” I have linked it if you would like to read it.

So this got me thinking, why can’t I use make my own bread? It is not hard and most of the ingredients you probably already have in your pantry. I started by making a simple loaf of bread (I will post this recipe in the following weeks) and let me tell you, I have fallen in love with bread making. There is something satisfying in knowing what is in your food that you are feeding your body and your family.

The first recipe I will share.. drum roll… Garlic Bread!! Who doesn’t love garlic bread?! I made it last week for our pasta night and it was a success!

The ingredients you will need:
– 2 tablespoons granulated sugar
– 2 1/4 teaspoon (1 packet) active dry yeast
– 1/2 cup of water
– 1/2 whole milk
– 2 1/2 cups of all purpose flour
– 1 teaspoon salt
– 1 tablespoon olive oil
– 1/2 cup (1 stick) unsalted butter, softened
– 3 tablespoons of chopped fresh parsley
– 2 teaspoons minced garlic
– pinch of salt
– 1 cup shredded cheese
– 1/4 cup grated parmesan cheese
– Ground black pepper to taste

I know it sounds like a lot of things, but trust me you can do this!

Step 1:
In a small bowl, combine sugar and yeast. Combine the 1/2 cup of water and 1/2 cup of milk in a mug and warm it up. The liquid should be around 110 to 115 degrees, then pour warm water over sugar mixture and let it stand for 10 minutes until yeast is foamy. (Important note: make sure the warm milk/water mixture is between 110 to 115. If it is cold, the yeast will NOT activate and if it is to hot, you will kill the yeast.)

Step 2:
While the yeast is activating, in a large bowl or in the bowl of the stand mixer with dough hook attachment, mix the flour and salt until combined. Pour the yeast mixture (after the 10 minutes are over); stir with wooden spoon or on low speed with dough hook host until dough forms. Transfer dough to a well- floured surface and knead by hand for 10-15 minute, until the dough is smooth, soft, elastic and only slightly sticky. OR, knead dough in stand mixer with dough hook for 5-7 minutes on medium speed, until it is ready. Note: for both options, you can add a 1 teaspoon at a time if you need a bit more flour. Transfer the dough to a lightly greased bowl. (I get some olive oil, and drizzle it onto the bowl and with a paper towel, spread it all around the bowl). Once the dough is in the bowl, cover with plastic wrap or towel and let it rise in a warm place for 1 hour until it has doubled in size. I like to put the dough inside a cabinet next to the stove. Whatever you do, do NOT open the cabinet door or peek inside the covered bowl or you can release the warmth it needs to rise.

Step 3:
Heat oven to 400 degrees. Spray a cooking sheet and set to the side. In a small bowl, stir in softened butter, your cut parsley, garlic and a pinch of salt until well combined.

Step 4:
Punch down the dough and divide it into 2 pieces. Place both pieces on a lightly floured surface and let it rest for 5 minutes, covered with a clean kitchen towel. After the 5 minutes, on a floured surface, roll 1 piece of dough into a rectangle, roughly around 14×8 inch rectangle. Spread butter mixture evenly over the dough. Next, sprinkle cheese and a dash of black pepper. Roll the dough from long end into a 14 inch log. Pinch the sides to seal.

Step 5:
With log seam side-down, carefully slice dough almost completely through into a 1-inch rolls. Make sure they are still connected at the bottom. Lift dough. carefully and transfer it to your prepared cookie sheet. Rewear until you have both logs.

Step 6:
Spread the remaining butter mixture over the top of the rolls. Cover the pan and let the dough rest for 15 to 20 minutes.

IMG_0439

Step 7: Bake bread for 20- 25 minutes until deep golden brown.


Enjoy!!

Deep in the Heart of Texas

Bluebonnet season is here!! Who else is as excited as I am?

If you are a Texan, you know this is the time of year when the weather gets warmer, days get longer and fields gets covered with bluebonnets. If you are looking for family pictures, this is the time to carve some time from your busy schedule to go out and capture those breath taking memories.

For those of you that may not be from Texas, let me explain a bit about the bluebonnet. Number 1: This is our state flower, and when they start sprouting you know it’s springtime. Number 2: When you see the fields covered in these purple/blue hues, it looks magical. And lastly, its the best state flower out of all the other states. (I am being a bit bias here ❤ ).

blunonnets2

If you live in the Houston metro area, you are in luck, they have started to sprout in several places, like Buffalo Bayou, White Oak Bayou, the museum district, and Sugarland. The thing with bluebonnets is that this is a wildflower, so they will pop up in different places, so you just have to be in the lookout for a good spot. If you ask me, this is the best thing because it becomes a mini adventure. However, if you are looking for fields of bluebonnets instead of just a couple of patches then this will require a mini road trip. You can head out to Brenham TX, the Hill Country, Austin or San Antonio. We headed to Brenham this weekend and found the best spots for our family pictures.

Now, before you go out there in your search of the perfect picture, a couple of things to keep in mind.

1. This is our state flower and even though it is not illegal to pick them (Although we all think it is) please don’t. These are wild flowers and we need them to fully blossom so that they can bloom again next year.

2. Be respectful, the bluebonnets are delicate! Tread around them. Respect people’s property. If you see a perfect spot but it is inside gated land, do not enter.

3. Be safe especially if you are out in the fields, there might be thorns or there might be snakes. Also keep in mind that with spring time in full swing, so is the humidity and mosquitoes. And remember to stay hydrated out there.

blunonnets1

blunonnets3

A couple of tips: Take a small blanket or towel to sit on. If you have little kids, I would suggest taking a little step for them to sit on. And lastly, think of your outfit ahead of time. Make sure the whole family matches, it will make your pictures come out even better 🙂

A little over a year has past

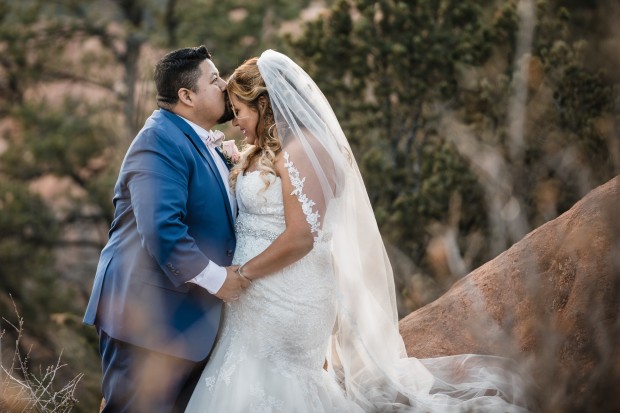
A little over a year has past since I married my best friend and I still think of that special day in Colorado. I have linked our wedding highlight video here

Does anyone else sometimes feel like time goes by so fast? Well wedding time goes by faster. You spend all the time and effort for the big day and when it finally arrives it is over in a blink of an eye. I am so glad we had an amazing photographer and videographer to capture all the great moments.

H2

Christmas time!!

It is almost Christmas time!! Is anyone else as excited as I am? I love Christmas!! I don’t know if it’s the family, the food, the lights and present but it’s my favorite time of year.

Next week I will be sharing a Christmas cookie recipe! It will have you making cookies like a pro. See you soon!!

Pumpkin Sweet Bread

Halloween is right around the corner and Thanksgiving is creeping up on us! You know what that means… holiday parties and get-togethers. Sometimes the worst part is not know what to take with you to share. I made these little pumpkin sweet breads and they are a hit and super easy to make.

P3

You will need:

  • 1 envelope of active yeast
  • ½ cup of whole milk, scalded* and cooled to 110 degrees
  • ¾ cup of brown sugar
  • 1 tablespoon of granulated sugar
  • 4 tablespoons of butter, softened
  • 2 teaspoons of pumpkin pie spice
  • 2 eggs
  • 1 cup pumpkin puree
  • 4 cups all-purpose flour
  • 8 ounces of cream cheese, cut into slices

Steps:

In a small bowl, place yeast, scalded milk and granulated sugar. Allow the yeast to bloom for about 10 minutes until frothy.

After the yeast mix is frothy, you will add the brown sugar, butter, spices, eggs, pumpkin puree and flour. Mix until well combined; knead dough for about 8 to 10 minutes until smooth and soft.

Place the dough in a greased bowl or plate, cover it with linen and allow the dough to rest for about an hour, or until it has doubled in size.Divide the dough into 16 pieces.

Fill each dough ball with a cube of cream cheese. Wrap each dough ball with kitchen twine, wrapping the twine around the dough ball to create a pumpkin shape. Make sure not to wrap the dough to tight, as it will become larger when baked. Let them pumpkin dough rest for about an hour before baking.


Preheat oven to 350 degrees. Bake the pumpkins for 20-25 minutes. Remove from the oven when baked through and are golden brown. Allow the rolls to cool for a few minutes, then remove the twine and place a pecan or almond as the stem for each pumpkin. Enjoy!

Diego Rivera Brought Us Together

I never wanted to get married. Let’s start there.

I know it sounds silly but it’s true, the idea of getting married sounded scary. How could I not get bored of just one person? The thing is that if you know me, you know that I can’t commit to things for a long period of time. I am one to pick somethings up, be good at it but then get bored and off to the next thing I go. Let me give you some examples of things I have tried, mastered and then stopped all together: Soccer, tennis, karate, photography, painting, violin, piano, and wood-shop just to give you an idea. So then how could I commit to just one person for the rest of my life?! That sounded absurd.

I met my husband at work. If I think about it… Diego Rivera brought us together. Yes, the painter. He had this painting of Diego hanging in his office, I remember looking around and seeing all the little trinkets, pictures and then BOOM, just one big painting right in the middle. I assumed he liked the painting but maybe he did not know who painted it. So I asked, “do you know who painted that” he looked at me and smiled and said “Diego, he is my favorite”. Something we had in common. We began hanging out, but I made sure to let him know not to get attached to me, I was not looking for a relationship. Yes, I can be a little blunt sometimes. Obviously that “warning” completely backfired on me; we got married last year.

My husband moved from California to Texas 6 years ago, and I tell him God sent him here so he could meet me. He has a love/hate relationship with Texas and he assures me that we will move out of state one day. But I think deep down he knows this is now home. Cue in the song: “the stars at night, are big and bright (clap) deep in the heart of Texas”!!!

I know everyone says they have the best husband, but I think mine is the cream of the crop. He is funny, smart, caring. I am one lucky girl to have him next to me every single day. I tell him the perks of being married is that I get to bother him every single day. I was once afraid of being married; now I’m glad that I am. If you choose the right one, marriage is not hard and can be lots of fun. It’s having a never ending slumber party with your best friend. Love you mi gordito hermoso.

H4H5H2H1H3

Broccoli Stuffed Chicken Breast

Lately I have been cooking some yummy foods and I just need to share them.

I love cooking, but only if I am sharing it with someone. Last week my husband was out of-town and realized that I did not cook once for myself. (I went to my mom’s to eat) So if I love cooking and sharing what I make, I need to share the recipes so you can try them and share them with your loved ones.

A couple of weeks ago I made these stuffed chicken breast filled with a broccoli and cheese mixture. It delish!

Ingredients:

  • 3-4 large chicken breasts
  • Salt & Pepper
  • 1 ½ tsp garlic powder
  • ¼ tsp paprika
  • 1 cup of chopped broccoli
  • ½ cup of peas and carrots
  • 1-cup mozzarella cheese
  • 1 tbsp of mayo
  • 2 tbsp olive oil

Instructions:

Preheat oven to 425 degrees F.

Season both sides of the chicken breast with salt, pepper, paprika, and garlic powder. Use a sharp knife to cut a slice through the middle of the chicken breast, just enough to make a pocket for the filling. Once you have your pocket opened, I add more garlic powder to the inside; you can never go wrong with garlic.

For the filling, place the chopped broccoli in a microwavable dish and add about 2-3 tablespoons of water. Cover and microwave for about 1 minute. Drain any excess water. Then add the ½ cup of frozen peas and carrots, mayo, cheese and salt and pepper. Mix until combined, and then stuff the chicken breasts. You can use a toothpick to secure the stuffing if necessary.

Heat a large skillet over medium heat and add olive oil. Sear the chicken for about 3-4 minutes on each side. Then transfer the chicken breast to an oven safe baking dish or you may place your skillet in the oven if its oven safe. You will bake the chicken for about 15-20 minutes, or until the chicken is 165 degrees.

To finish off the dish I accompanied the chicken with some cauliflower rice. If you try it, let me know your thoughts on it. Hope you enjoy.


M.I.A

It has been a while since I have posted anything, SORRY!!!

Sometimes life gets busy and you forget things. But I am back and ready to start posting! I will attempt to write two blogs per week, who’s ready ??!?!?!!

Becca Foundation Review

I was asked to review the Becca Ultimate Coverage 24- hour Foundation. This foundation is supposed to be water-resistant, long wearing formula that features a perfectly balanced distribution of skin true pigments and has 22% water to allow the formula to adapt to all skin types for a second-skin, full coverage finish. It states that with one pump it effortlessly covers imperfections, redness hyperpigmentation, and uneven texture.

becca 4

All of this seems too good to be true right? So we tried it out and overall I would give this foundation a 4.5 out of 10.

I had high hopes for this foundation, the pros of this foundation is that it is waterproof so if you are looking for full coverage when you are heading to the pool or beach this foundation will stay on your face the whole day. Another positive is that the range of shades this foundationhas pretty good, it has 24 shades to choose from.

Now for the negatives… let’s start by saying that it’s hard to apply this makeup because of how thick it is. Since it is waterproof, you can’t just damp a beauty blender and start dabbing. I suggest you apply this foundation on prepped skin (I used the Becca First light priming face primer, I loved this primer) and apply the foundation with a brush. Using a blush will allow you to actually spread the product all over the face. Then with your damp beauty blender go in with a dab to create a more airbrush look.

Another thing that I disliked is that it’s actually quite sticky/tacky. If you use this foundation, you will need to set it with a translucent powder. The worst part about it is that it is very heavy/cakey. I have used other full coverage foundations but with this one, you feel like your skin cannot breathe at all.

The foundation does come out good in pictures but for the price you are paying $44.00 USD I would expect more, this foundation is NOT my favorite. If you guys want a makeup tutorial video, let me know on the comments below.

becca1

becca2becca 3